 自学教程
自学教程打开 PostgreSQL 官网 https://www.postgresql.org/,点击菜单栏上的 Download ,可以看到这里包含了很多平台的安装包,包括 Linux、Windows、Mac OS等 。
Linux 我们可以看到支持 Ubuntu 和 Red Hat 等各个平台,点击具体的平台链接,即可查看安装方法:
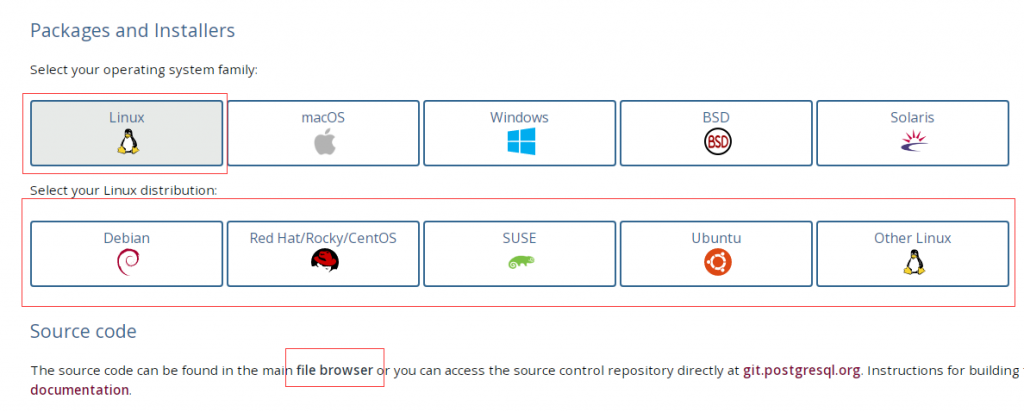
点击上图中的 file browser,我们还能下载 PostgreSQL 最新的源码。
本章节以 Ubuntu 为例。
Ubuntu 安装 PostgreSQL 13
Ubuntu 可以使用 apt-get 安装 PostgreSQL。
方法一:通过 Ubuntu 存储库安装 PostgreSQL
sudo apt-get update
sudo apt-get install postgresql-13 postgresql-client-13
根据提示输入你的密码,依据于你的网速情况,程序将在几秒到几分钟安装完成。
postgresql-contrib 或者说 contrib 包,包含一些不属于 PostgreSQL 核心包的实用工具和功能。在大多数情况下,最好将 contrib 包与 PostgreSQL 核心一起安装。
方法二:在 Ubuntu 中安装 PostgreSQL 13
要安装 PostgreSQL 13,你需要在 sources.list 中添加官方 PostgreSQL 存储库和证书,然后从那里安装它。
不用担心,这并不复杂。 只需按照以下步骤:
# 1.创建文件库配置 / Create the file repository configuration:
sudo sh -c 'echo "deb http://apt.postgresql.org/pub/repos/apt $(lsb_release -cs)-pgdg main" > /etc/apt/sources.list.d/pgdg.list'

# 2.导入仓库签名密钥(GPG 密钥) / Import the repository signing key:
wget --quiet -O - https://www.postgresql.org/media/keys/ACCC4CF8.asc | sudo apt-key add -

# 3.更新套餐列表 / Update the package lists:
sudo apt update

# 4.安装最新版本的 PostgreSQL / Install the latest version of PostgreSQL.
# 如果您想要特定的版本,请使用‘PostgreSQL-12’或类似版本代替‘PostgreSQL’ / If you want a specific version, use 'postgresql-12' or similar instead of 'postgresql':
sudo apt -y install postgresql-13
安装完毕后,系统会创建一个数据库超级用户 postgres,密码为空。
# sudo -i -u postgres这时使用以下命令进入 postgres,输出以下信息,说明安装成功:
postgres@ubuntu:~$ psql
psql (13.10 (Ubuntu 13.10-1.pgdg18.04+1))
Type "help" for help.

postgres=#
查看 postgresql 版本:
postgres=# SELECT version();
                                                              version
-----------------------------------------------------------------------------------------------------------------------------------
 PostgreSQL 13.10 (Ubuntu 13.10-1.pgdg18.04+1) on x86_64-pc-linux-gnu, compiled by gcc (Ubuntu 7.5.0-3ubuntu1~18.04) 7.5.0, 64-bit
(1 row)
输入以下命令退出 PostgreSQL 提示符:
\q
PostgreSQL 安装完成后默认是已经启动的,但是也可以通过下面的方式来手动启动服务。
sudo pg_ctlcluster 13 main start  # 开启
sudo pg_ctlcluster 13 main stop  # 关闭
sudo pg_ctlcluster 13 main restart  # 重启
sudo pg_ctlcluster 13 main status  # 查看运行状态
或
sudo /etc/init.d/postgresql start   # 开启
sudo /etc/init.d/postgresql stop    # 关闭
sudo /etc/init.d/postgresql restart # 重启
sudo /etc/init.d/postgresql status  # 查看运行状态
此时 PostgreSQL 就已经安装好了,你可以开始使用它了。
PostgreSQL GUI 应用程序/客户端管理界面
你也可以安装用于管理 PostgreSQL 数据库的 GUI 应用程序(pgAdmin):
sudo apt install pgadmin4CentOS 7 安装 PostgreSQL 13
下载rpm包:
# 下载 RPM 包:
sudo yum install -y https://download.postgresql.org/pub/repos/yum/reporpms/EL-7-x86_64/pgdg-redhat-repo-latest.noarch.rpm

# 安装 PostgreSQL 13 客户端:
sudo yum install -y postgresql13

# 安装 PostgreSQL 13 服务端:
sudo yum install -y postgresql13-server

# 初始化数据库和设置开机启动:
sudo /usr/pgsql-13/bin/postgresql-13-setup initdb
sudo systemctl enable postgresql-13
sudo systemctl start postgresql-13
注意PostegreSQL 默认用的端口是5432,请设置防火墙打开5432端口。
测试是否监听:
#查看CentOS 端口命令:
netstat -lntp #查看监听(Listen)的端口

# netstat -antp #查看所有建立的TCP连接